
Indulge in the Silky Smoothness of a Flourless Chocolate Cake
Imagine a dessert that combines the best qualities of a brownie, cake, truffle, and mousse. That's exactly what you get with a flourless chocolate cake. The texture is divine, with a silky smoothness that will leave you wanting more. It's the perfect treat to impress your guests at your next dinner party.
Understanding the Gluten-Free Nature of Flourless Chocolate Cake
While flourless cakes are often associated with gluten-free diets, it's important to note that they are not always the same. Gluten-free refers specifically to the absence of gluten, a protein found in various ingredients beyond flour. For those with celiac disease, it's crucial to check the ingredients for gluten-free certification and ensure that there's been no contact with flour during preparation.
Unveiling the Key Ingredients for a Perfect Flourless Chocolate Cake
Let's take a look at the essential components of a mouthwatering flourless chocolate cake:
- Chocolate: Opt for semisweet chocolate chips or your preferred dark or bittersweet chocolate variety.
- Butter: Always use unsalted butter for baking.
- Sugars: Regular granulated sugar adds sweetness and enhances texture.
- Espresso Powder: This optional ingredient subtly elevates the chocolate flavor.
- Salt: Fine sea salt is preferred for its aromatic qualities.
- Vanilla Extract: A dash of vanilla extract enhances the overall flavor.
- Eggs: Three whole eggs plus an extra egg yolk create a fudgy texture and provide structure in the absence of flour. Be sure to use room temperature eggs.
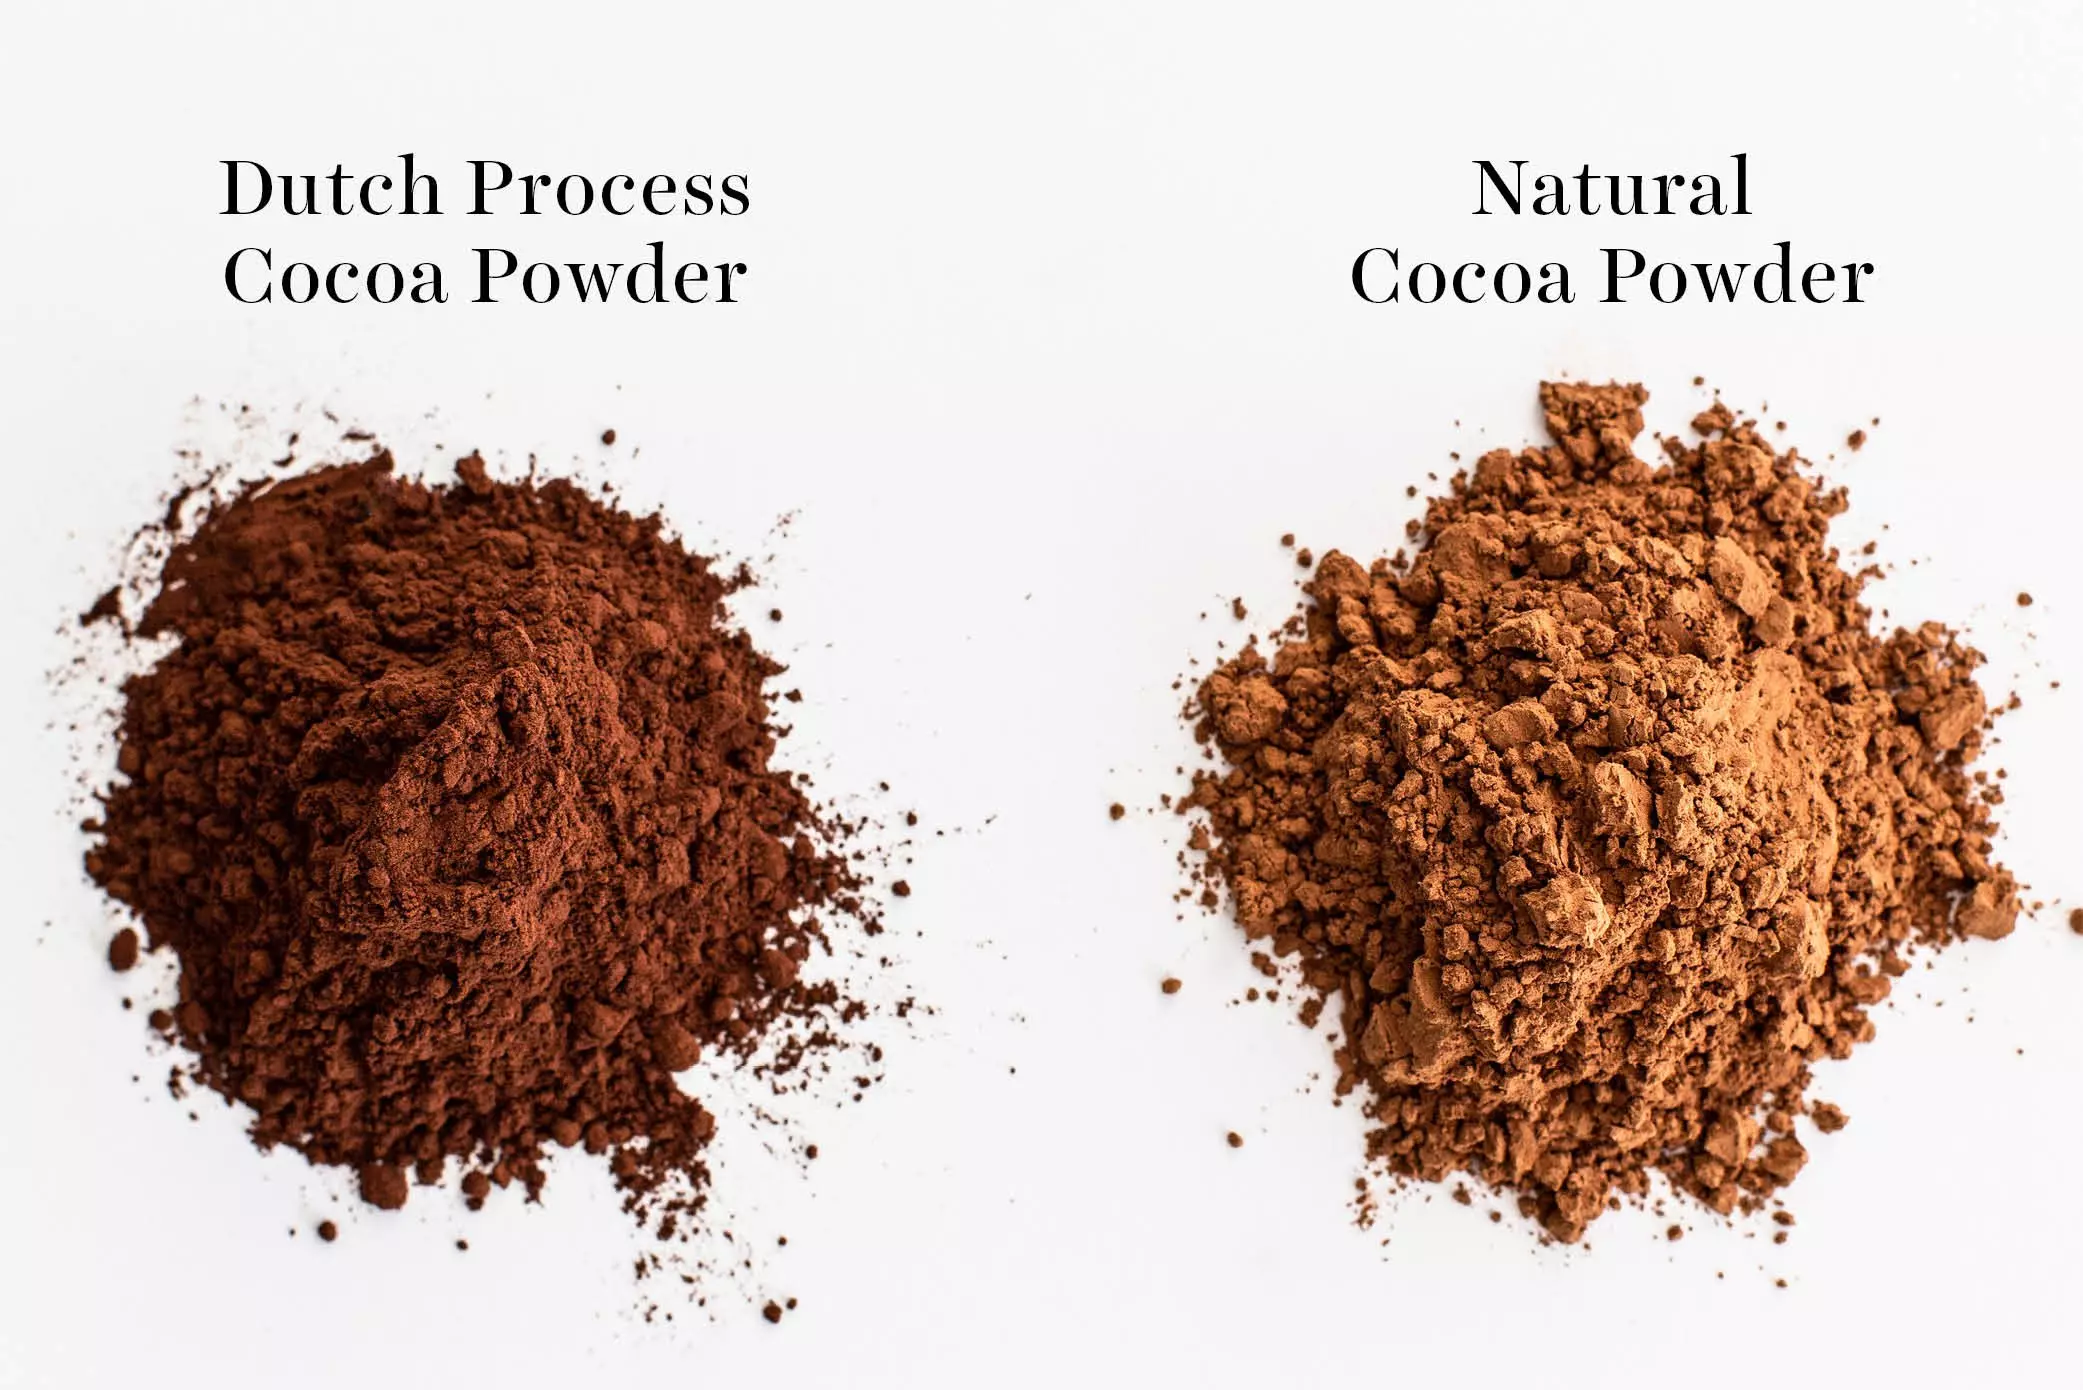
- Cocoa Powder: Dutch-processed cocoa powder ensures a decadent chocolate flavor and rich color. Natural cocoa powder can be used as an alternative.
- Heavy Whipping Cream: Chilled cream adds a luscious touch to the cake.
- Powdered Sugar and Berries: Optional, but highly recommended for an exquisite presentation.
 Comparison of Dutch process vs natural cocoa powder
Choosing the Perfect Chocolate for Your Flourless Cake
For a truly indulgent experience, opt for high-quality chocolate. While I used Ghirardelli semisweet chocolate chips for this recipe, you can choose your preferred brand. Whether it's chocolate chips, wafers, or chopped baking chocolate, select something that tickles your taste buds. Brands like Guittard or Callebaut offer a luxurious, upscale flavor that elevates the overall experience.
Navigating the Realm of Cocoa Powder
While the selection of cocoa powder is not as critical as in other recipes due to the absence of leavening agents, it still makes a difference. Dutch-processed cocoa powder, with its higher fat content, provides a richer and more moist texture, enhancing both flavor and appearance. However, high-fat natural cocoa powder can be used as a substitute. It's all about personal preference and the desired level of indulgence.
 Flourless Chocolate Cake
The Art of Creating a Flourless Chocolate Cake
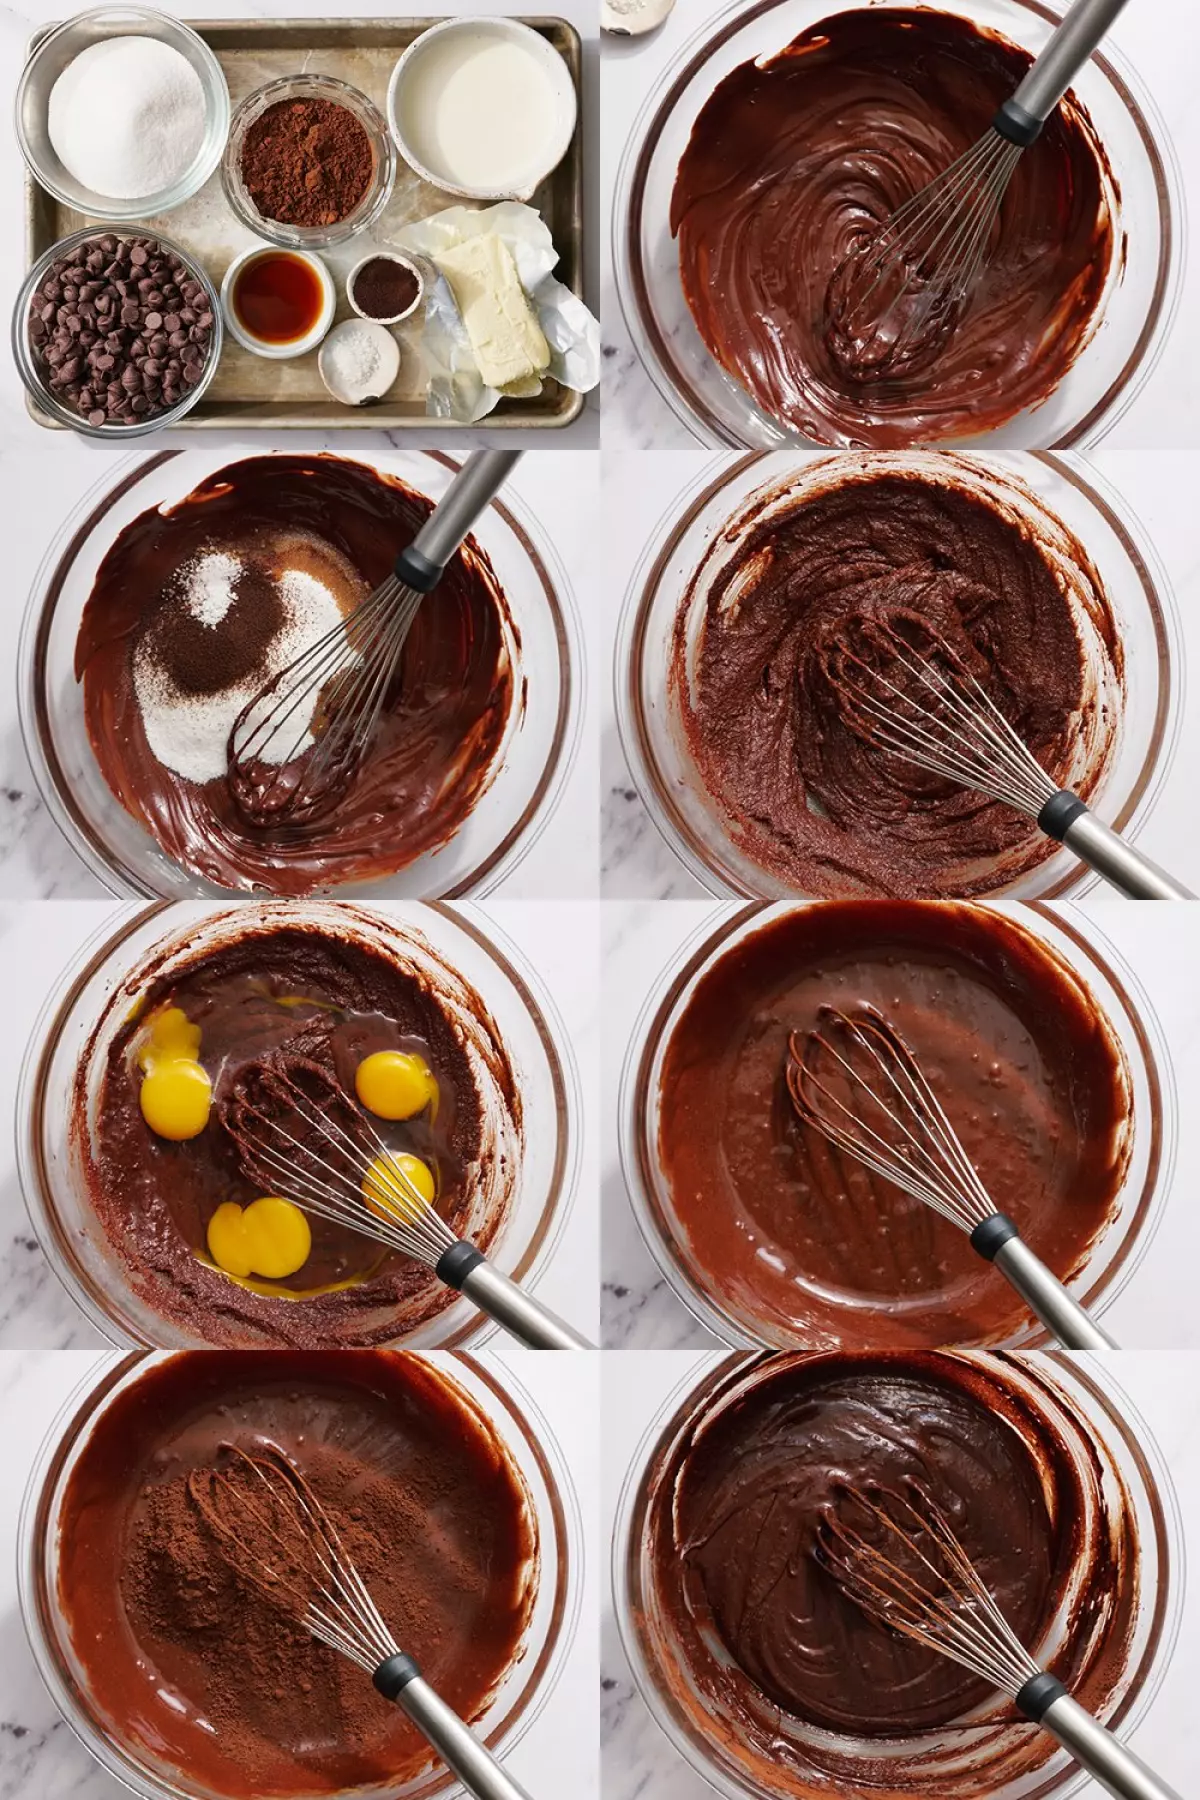
Let's walk through the step-by-step process of making a tantalizing flourless chocolate cake:
-
Melt the chocolate and butter: Heat the chocolate and butter in a microwave-safe bowl, stirring at 30-second intervals until just melted. Alternatively, use a double boiler or a heatproof bowl over a small saucepan on medium-low heat.
-
Add sugars, espresso powder, salt, and vanilla: Whisk until combined, then let the mixture cool to room temperature.
-
Incorporate the eggs: Add the eggs and whisk vigorously until smooth.
-
Mix in the cocoa powder: Whisk until well combined.
-
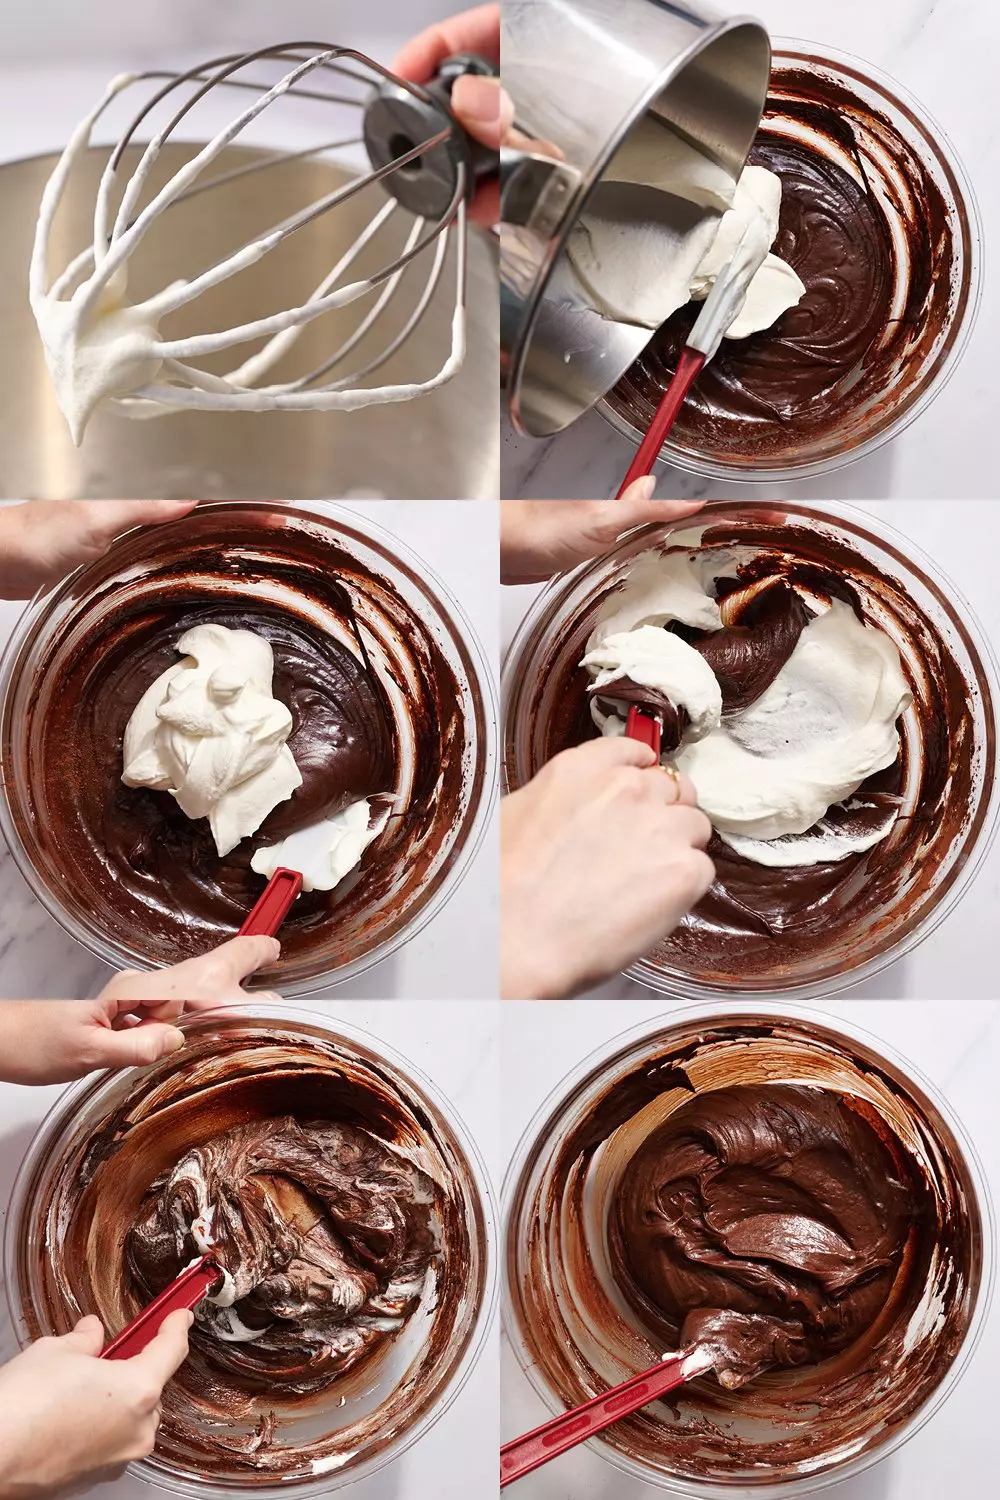
Whip the heavy cream: Beat the cream to medium peaks, ensuring not to overbeat.
-
Fold the whipped cream into the chocolate mixture: Gently combine using a rubber spatula.
-
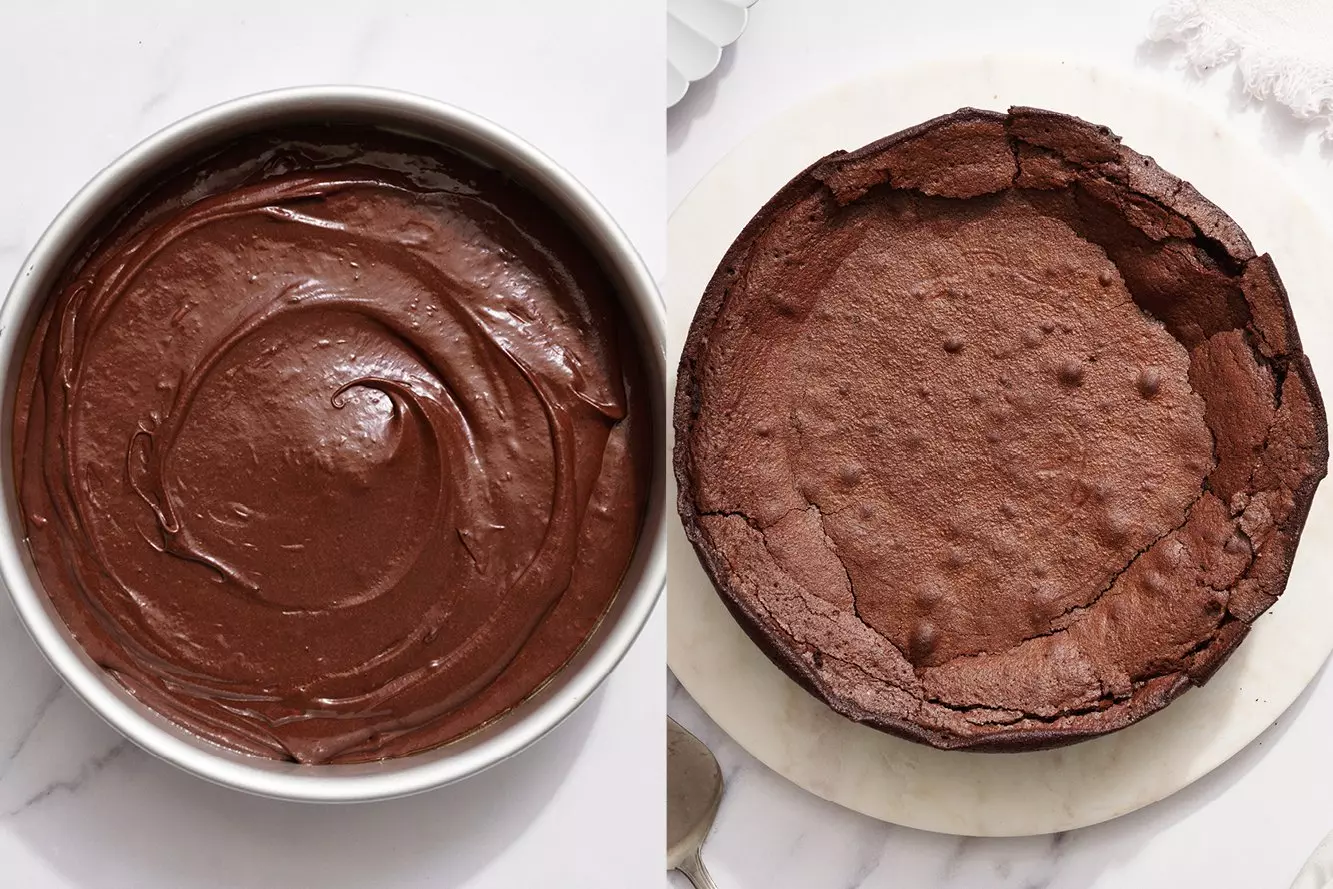
Bake the batter: Pour the batter into a prepared pan and bake at 350°F for approximately 25-30 minutes. The cake is ready when the edges are set, but the center is slightly wobbly and reaches a temperature of at least 200°F.
-
Allow the cake to cool completely: Place the pan on a wire rack and refrigerate for a minimum of 6 hours, preferably overnight, to achieve a fudgy texture.
-
Serve in style: Dust the cake with powdered sugar or cocoa powder. Slice it using a sharp knife, running it under hot water and wiping it between cuts. Top each slice with sifted powdered sugar, whipped cream, or a scoop of ice cream, and garnish with fresh raspberries, strawberries, or a sprig of mint.
 Flourless Chocolate Cake
The Tools of the Trade
To make the perfect flourless chocolate cake, here are some recommended baking essentials:
- 8-inch light-colored round baking pan
- Parchment circles with tabs for easy removal
- Digital thermometer for precise testing
- Immersion blender for whipping cream
- Oven thermometer to ensure accurate temperature control
Choosing the Right Pan for Your Flourless Chocolate Cake
Use an 8-inch round cake pan with a light-colored interior for optimal results. The batter is substantial, so a deep 3-inch pan will prevent overflow. Fat Daddio's cake pans are my personal favorite due to their even baking and easy cleaning properties. Avoid using dark-colored or coated nonstick pans, as they may result in dry or overbaked edges. It's also crucial not to use a larger pan, as it will yield a significantly thinner cake.
Prepping your Pan for Success
To ensure your cake comes out of the pan effortlessly, follow these steps:
-
Lightly grease the pan with nonstick cooking spray. Pam nonstick spray works best in this case, as other sprays containing flour might prevent the cake from clinging to the sides of the pan.
-
Place a parchment paper round at the bottom of the pan and spray it again. Baking parchment rounds with tabs are highly recommended, as they facilitate the easy removal of the cake without any damage.
-
While I haven't tested it personally, a springform pan of the same size should work just fine.
Determining When Your Cake is Perfectly Baked
Having a digital instant-read thermometer will greatly assist you in gauging the cake's doneness. Carefully test the center of the cake, as the thermometer's probe will create a small hole. By testing in the middle, you can easily camouflage the hole when serving it. If you don't have a thermometer, look for signs that the cake has puffed up, with set edges that have slightly pulled away from the sides of the pan and a slightly wobbly center. Be cautious not to overbake, as it will result in an unpleasant, tough texture.
 Flourless Chocolate Cake
Embracing the Natural Beauty of a Slightly Fallen Cake
Don't fret if your flourless chocolate cake slightly collapses after baking. This is entirely normal, as flour usually provides the structural support in traditional cake recipes. The absence of flour means that some falling is inevitable. In fact, it adds to the rustic charm of this type of cake. Excessive falling is often a result of overmixing, so it's essential to handle the ingredients gently, particularly in the final steps.
Patience is a Virtue When It Comes to Enjoying Your Flourless Chocolate Cake
As tempting as it may be to devour your creation right away, exercise restraint and allow the cake to cool completely. The delicate nature of the cake requires ample time to set up. Cooling it in the pan is advisable, followed by several hours in the refrigerator, ideally overnight. The result will be a richer, fudgier texture that is well worth the wait. Plus, preparing it a day in advance for a special occasion means you can focus on other aspects of the event!
The Art of Presentation and Serving Suggestions
When it comes to decorating your flourless chocolate cake, simplicity is key. A light dusting of powdered sugar or cocoa powder combined with a few berries is all you need. If you're looking to elevate the presentation, consider a small piped rosette of whipped cream or a scoop of vanilla bean ice cream accompanied by fresh berries. Garnishing with fresh mint leaves adds an extra touch of gourmet sophistication.
Feel free to experiment by adding cooled chocolate ganache (using a 1:1 ratio) or a raspberry topping to the cake. To slice it elegantly, use a sharp knife, rinsing it under hot water and wiping it clean between each cut. Feel free to add garnishes after slicing as well.
Storing and Freezing Your Flourless Chocolate Cake
To keep your cake fresh and firm, store it in an airtight container in the refrigerator for up to three days. If you have leftovers or wish to prepare in advance, fear not! This cake freezes beautifully. Wrap the entire cake or individual slices in plastic wrap, place them in an airtight container or zipper bag, and freeze for up to two months. Thaw in the refrigerator for a few hours or overnight. Just note that any powdered sugar or cocoa powder dusted on top may absorb during thawing. Simply re-dust before serving to restore its delightful appearance.
Now that you're armed with the knowledge to create a tantalizing flourless chocolate cake, it's time to put your skills to the test. Indulge in this decadent treat and delight your guests or loved ones with a dessert experience they won't soon forget.


